2:Garment Making Process
-
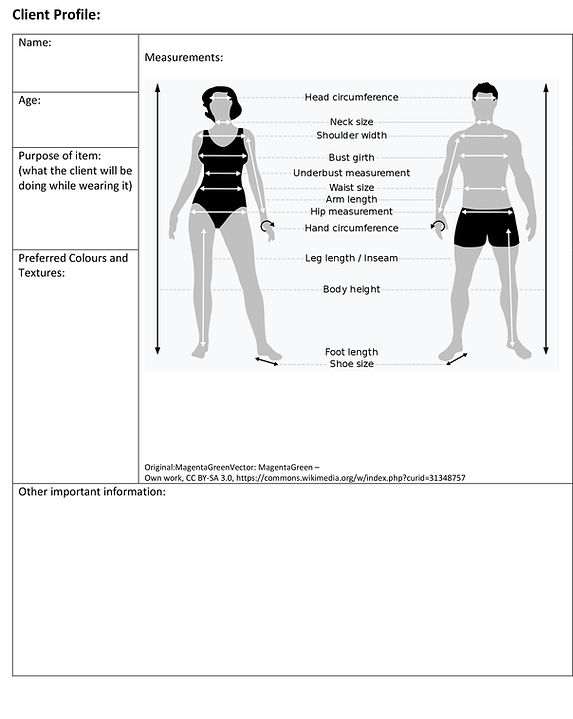
Purpose/ Client:
-
Ideating/ Constraints:
-
Prototyping/ Testing:
-
Making:
-
Reflecting:
-
Documenting/ Sharing:
1: Purpose/ Client
This step requires brainstorm. Answer the following questions:
What is the purpose of making clothing or items from textiles?
Who is our client and what are their needs? What is the history of this item/ fabric/ idea?
How can the history of this idea move forward and be relevant to the client today?
2: Ideating/ Constraints
Ideating is the process of coming up with ideas for your designs. You may be given constraints to work with by your teacher/ client, as a need for colour, shape or idea.
Understanding fabric is also essential to design, as it is one major constraint you have to consider. Discerning which fabrics will work best for a given purpose will need to play into how a design will behave, and what other properties will be required for a garment.
A great way to make sure you and your client have the same vision, or to showcase your ideas, is to create a mood board/concept board.
Here is a great video on how to create a mood board (beside) and some photo examples (below).
One place to start is by making a croquis. A croquis is a drawing that is used to show the design of a garment on a model, and is often used to plan and consider different fabric, patterns, or colour choices.
A fashion croquis is a drawing of the garment on a model in a dynamic pose.


3: Prototyping/ Testing
Once a croquis is made, a flat is drawn out. A flat is what the garment would look like laying on a table. The flat also includes information about the information needed to create a drape and a pattern, like measurements and stitch lines.
Sometimes, a muslin, (or light cotton) prototype is made by draping onto a dress form.
Once your flats (or drape) is completed, a pattern is made to the specifications of the flats/ drape. The pattern is drawn in the actual size that the garment pieces will be in.
A pattern can be pinned together to test is the design is a good fit. At this point adjustments to the pattern can be made.
Once the pattern is to satisfaction, it can be pinned to fabric to be cut out. The pattern will include information about how to cut out the fabrics, including which direction the grain should be going in relation to the pieces.
Often when creating garments, people will use commercially-made patterns where the manufacturer has already done many of the prototyping and testing steps.